Mealybugs are a major problem for houseplants because these pesky little insects deplete plant nutrients and annoy gardeners. In a short amount of time, these tiny sap-suckers will cover your plants from top to bottom with a sticky honeydew that will encourage the formation of mold and hasten their demise. By following this comprehensive guide, you will be able to protect your plants from pests with easy-to-implement natural remedies.
To effectively manage mealybugs, one must first comprehend their habits. Finding mealybugs early is challenging because they prefer warm, humid conditions and often hide in soil, stem joints, or leaf fissures. A little knowledge of their habits and prompt intervention can rescue your plant collection from extensive harm.
This post provides fourteen practical suggestions for making your home more accessible, all of which are well-planned and simple to implement. There is evidence that these methods can get rid of mealybugs without resorting to harmful chemicals. You will find out how to spot bugs quickly, treat them precisely, and avoid future infestations so that your plants stay healthy.
The goal in developing these treatments was to make them as simple to use as possible while still producing noticeable results. They include rubbing alcohol swabs, neem oil sprays, and companion planting. To save your home and plants, the guidance centers on eco-friendly, non-toxic approaches. If you’re not excellent at gardening, don’t worry—these remedies will quickly bring your plants back to life.
To cope with mealybugs, you should arm yourself with the knowledge and skills provided in this article. Without worrying about pests, your houseplants will flourish, and your gardening self-assurance will soar. Look at these simple, natural techniques to keep your plants safe and flourishing in any kind of garden, indoors or out. What are we waiting for? Let’s look at fast fixes for mealybug infestations.
Fast-Acting Mealybug Remedies You Can Make at Home— No Chemicals Needed
Spotting Mealybug Infestations Early to Protect Your Plants from Damage
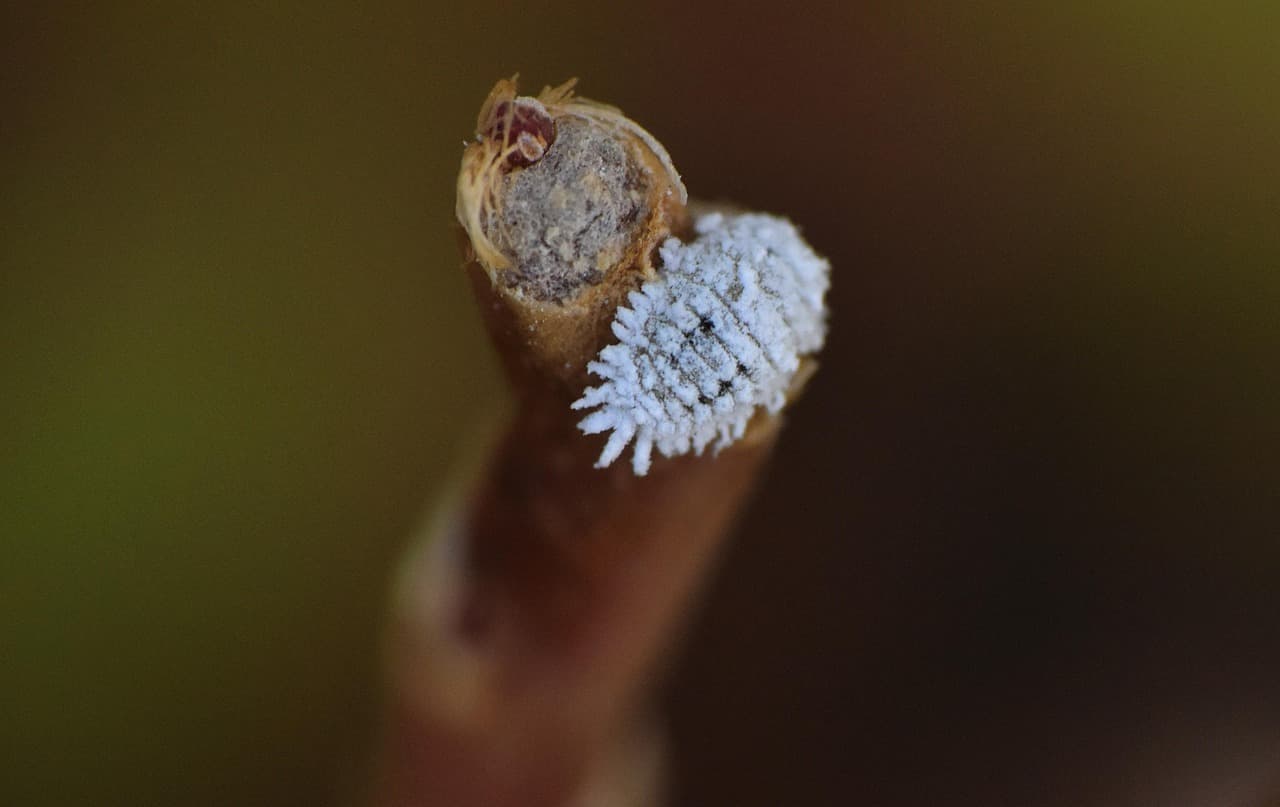
To keep plants from suffering significant harm, identifying mealybug infestations quickly is crucial. Look for clusters of white, cottony material on the stems, roots, or leaves; these might be mistaken for lint or mold. Due to their preference for hiding in crevices, such as veins, under pots, and in the axils of leaves, these pests demand meticulous inspections.
One way to go about detecting mealybug presence on houseplants is to search for sticky honeydew, a sweet, sticky fluid that covers surfaces and attracts ants. This waste often leads to the growth of black sooty mold, which is a clear sign of an infestation. If you want to catch issues with your plants early, check for stickiness with a damp cloth during your weekly inspections.
Weak indications like wilting, stunted growth, or leaf yellowing are what recognizing early signs of mealybugs means. When mealybugs feed on plant sap, it weakens the plants and causes the leaves to droop or curl. We can take quick action by observing tiny, moving crawlers under a microscope before they form noticeable colonies.
Monitoring houseplants for mealybug activity demands meticulous attention at all times, but especially during the spring and summer, when everything is at its busiest. Before adding new plants to your collection, make sure to check for these common carriers. Use a cotton swab or toothpick to probe cottony lumps to confirm the presence of pests.
Catching mealybug infestations before escalation has two advantages: less treatment effort and saving plants. Quickly separating the sick plants will prevent the illness from spreading to other plants in the area. Your plants will remain healthy and beautiful as long as you monitor them regularly and act quickly if necessary.
| Signs | Description | Detection Methods |
|---|---|---|
| White cottony clusters | Resembles lint or mold | Visual inspection |
| Sticky honeydew | Sweet, sticky fluid, attracts ants | Damp cloth wipe |
| Black sooty mold | Grows on honeydew | Visual inspection |
| Wilting/leaf yellowing | Weakened plant, drooping leaves | Visual inspection |
| Tiny crawlers | Early-stage mealybugs | Microscope/magnifying glass |
Using Rubbing Alcohol to Wipe Out Mealybugs Instantly and Safely
Applying rubbing alcohol to mealybugs is a non-chemical way to get rid of them fast. Brushing a cotton swab with 70% isopropyl alcohol will eliminate the waxy layer that bugs have. Because it kills mealybugs on touch, this method is ideal for small, localized infestations.
The pests identified in treating houseplants with alcohol swabs are those hiding in crevices and joints, such as those found in stems and leaves. Lightly spritz the affected areas using a spray bottle filled with a 1:1 alcohol-water mixture if the region is larger. Repeat every three to four days to eliminate newly born crawlers and prevent reinfestation.
Be careful when dealing with delicate plants, such as African violets or ferns, when using isopropyl alcohol to kill mealybugs; nonetheless, it is typically harmless when used as directed. Make sure there won’t be any discoloration or burning by testing a small leaf first. You shouldn’t soak the leaves since alcohol stresses out plant tissues.
Using alcohol to kill mealybugs naturally can effectively eradicate pests worldwide. For colonies that are difficult to remove, use a combination of swabbing and tweezers to remove them by hand. To simplify pest control, keep some alcohol in a spray bottle with a clear label and keep it handy for watering your plants.
Eradicating mealybugs with household alcohol is a cost-effective and environmentally friendly remedy. Following treatment, rinse the plants thoroughly to remove any remaining residue. Check in after a week to confirm that everything proceeded as planned. Gardeners seeking fast and non-toxic results highly recommend this method due to its simplicity and success.
| Methods | Concentration | Application Frequency | Notes |
|---|---|---|---|
| Cotton swab | 70% isopropyl alcohol | Every 3-4 days | Test on small leaf first |
| Spray bottle | 1:1 alcohol-water | Every 3-4 days | Avoid soaking leaves |
Crafting a Neem Oil Spray to Repel and Eliminate Mealybugs Naturally
Gather one teaspoon of pure neem oil and one quart of lukewarm water for the making-neem-oil-spray-for-mealybugs recipe. Add three or four drops of gentle dish soap to the liquid to emulsify it and make sure it spreads evenly. Combine all of the ingredients in a spray bottle and shake well to create a potent natural pesticide.
By smothering the mealybugs, applying neem oil to infested plants prevents them from reproducing. The undersides, leaves, and stems are excellent places for pests to hide, so be sure to spray them well. To prevent oil from scorching leaves in the sun and to encourage good air circulation, apply it in the evening.
Applying neem oil for mealybug control utilizes the plant’s natural antifungal and insect-repellent properties while ensuring that houseplants and outdoor vegetation remain unharmed. Instead of harming beneficial insects like ladybugs, neem oil actually protects them when applied correctly. Reapplying weekly for three to four weeks will completely interrupt the life cycle of the insect.

Complete eradication of houseplant pests requires regular spraying of neem oil; neglected areas allow pests to survive, so be careful to cover everything; to keep the solution effective, store it in a cold, dark place; and to prevent oil separation, shake well before use.
Controlling mealybugs with neem oil naturally is an effective prophylactic method that eliminates the need to deal with infestations in the future. After treatment, wipe the leaves with a damp towel to remove any remaining honeydew or oil. This eco-friendly method revives plants while protecting your home from dangerous pollutants.
| Ingredients | Quantity | Application Frequency | Notes |
|---|---|---|---|
| Pure neem oil | 1 tsp | Weekly for 3-4 weeks | Apply in evening |
| Lukewarm water | 1 quart | ||
| Gentle dish soap | 3-4 drops | Emulsifies solution |
Harnessing Dish Soap Solutions to Smother Mealybugs Effectively
To prepare dish soap spray for mealybugs, mix one tablespoon of gentle, non-detergent dish soap with one quart of water to create a uniform spraying solution. To lessen the strain on plants, choose a biodegradable soap, such as castile. To avoid creating too much froth, stir gently.
Distribute the spray evenly over the plant, paying special attention to the undersides of the leaves. After soaking for at least a day, gently rinse to remove any soap residue. Mealybugs are killed instantly when soap solution is applied to infected plants because it removes their waxy covering.
Using dish soap for mealybug removal is an effortless and cheap fix for growers. To make sure the plant will tolerate the mixture—some species, including succulents, are sensitive—test it on a single leaf first; it works well for early-stage infestations but may require multiple applications.
Applying soap spray to houseplants recommends respraying them every five to seven days until the pests disappear. After each application, carefully check on plants to see how they’re doing. Try combining manual removal with spraying if the issue continues. And remember to keep soap sprays out of direct sunlight to prevent scorching leaves.
Regarding eco-friendly gardening practices, eliminating mealybugs with dish soap naturally makes sense. Keep cleaning your plants often after eradication to keep pests away. This treatment is a popular choice for quick mealybug management without the use of harmful chemicals because it is both effective and simple to apply.
| Ingredients | Quantity | Application Frequency | Notes |
|---|---|---|---|
| Non-detergent soap | 1 tbsp | Every 5-7 days | Test on leaf; rinse after 1 day |
| Water | 1 quart | Use biodegradable soap |
Employing Manual Removal Techniques to Stop Mealybugs in Their Tracks
The meticulous but highly effective technique of removing mealybugs manually from plants is ideal for small infestations. Pay close attention to the cracks, fissures, and root zones where mealybugs often collect, and use a cotton swab, a gentle toothbrush, or tweezers to remove the pests from the stems and leaves.
The process of cleaning houseplants to eliminate mealybugs comprises wiping the leaves with a damp cloth that has been dipped in vinegar. Place the exterminated pests in a sealed plastic bag to prevent them from escaping or reinfesting. Regular cleaning not only keeps pests at bay but also enhances the plants’ appearance and overall health.
Using manual methods for mealybug control necessitates intense lighting to detect tiny crawlers, which are often nearly undetectable, but a magnifying glass can help find early-stage pests before they spread. Use alcohol swabs in conjunction with this method for faster and more thorough results.
Dislodging mealybugs from plant surfaces takes time, particularly for severely affected plants, because they can burrow into the substrate. Keep treated plants in quarantine for a minimum of two weeks to prevent the spread of pests.
For delicate plants that may not withstand sprays, manually removing mealybugs is the best method. Maintain a careful check on the plants and repeat the process every three to five days until you see no signs of pests. Ensuring safety and precision, this process is labor-intensive and does not use chemicals.
| Tools | Use Case | Frequency | Notes |
|---|---|---|---|
| Cotton swab | Remove pests from crevices | Every 3-5 days | Use with alcohol for efficiency |
| Toothbrush | Brush off pests | Every 3-5 days | Gentle brushing |
| Tweezers | Precise pest removal | Every 3-5 days | For stubborn colonies |
| Damp vinegar cloth | Wipe leaves | Every 3-5 days | Enhances plant appearance |
Using Horticultural Oil to Suffocate Mealybugs Without Harm
Put two tablespoons of light horticultural oil and one quart of water into a spray bottle. Apply evenly, paying special attention to the undersides of plants. When you apply horticultural oil to mealybugs, it forms an impenetrable barrier that suffocates the pests immediately upon contact.
Treating plants with horticultural oil can safely be sprayed on most houseplants and outdoor plants either first thing in the morning or last thing at night to protect them against heat-induced leaf burn. Reapply every seven to ten days for three weeks to kill any pests that have laid eggs or are still alive.
Instead of just killing mealybugs, using horticultural oil for mealybug control also stops them from breathing and stops them from laying eggs. Dried, it poses little threat to people or animals; nonetheless, before using it on sensitive plants like jade, it’s wise to test it on a small leaf.

Thoroughly spraying affected plants with horticultural oil is necessary to avoid missed places. Use a fine mist to avoid dripping, which might block the soil pores. Keep the oil in a cool, dry spot and give it a thorough shake before each use to make sure the mixture stays consistent.
After treating with Eliminating mealybugs with horticultural oil and physical removal, wipe the leaves to remove any excess oil or honeydew; such removal will enhance photosynthesis and is useful for severe infestations. This eco-friendly approach provides long-term management when used consistently.
| Ingredients | Quantity | Application Frequency | Notes |
|---|---|---|---|
| Horticultural oil | 2 tbsp | Every 7-10 days | Apply morning/evening |
| Water | 1 quart | Test on sensitive plants |
Leveraging Diatomaceous Earth to Dehydrate and Kill Mealybugs
In order to dehydrate pests, Applying diatomaceous earth to mealybugs makes use of a naturally abrasive powder. Apply a little coating of food-grade diatomaceous earth to the affected areas of the plant and soil around them. Wear a mask to protect yourself from breathing in tiny particles, and make sure the area is well-ventilated before applying.
The directions for Using diatomaceous earth for mealybug control calls for piercing the exoskeletons of mealybugs with its little, sharp edges to kill them by dehydrating them. Because water reduces its efficacy, reapply after watering.
To find mealybugs, look for them on lower stems and on soil surfaces. Since humidity hinders diatomaceous earth’s drying capabilities, treating plants with diatomaceous earth is most effective when done under dry conditions. If the infestation is severe, try using a combination of this substance and neem oil or soap sprays.
The preventative benefits of Controlling mealybugs with diatomaceous earth can be enjoyed by lightly dusting the area every two weeks. Vacuuming any excess powder off dishes and other surfaces will help keep the area clean. To ensure long-term efficacy, store in a tightly sealed container to prevent moisture intrusion.
A slow but successful strategy that assures long-lasting pest management without leaving chemical residues, Eliminating mealybugs using diatomaceous earth is perfect for eco-conscious gardeners. Inspect plants for signs of reduced pest activity after five to seven days and reapply if needed.
| Application Areas | Methods | Frequency | Notes |
|---|---|---|---|
| Plant surfaces | Light dusting | Every 2 weeks | Use food-grade DE |
| Soil | Light coating | Every 2 weeks | Reapply after watering |
Crafting Vinegar Sprays to Repel Mealybugs from Houseplants
To make it stick and penetrate better, add a drop of dish soap. To make it safe for plants, dilute white distilled vinegar with three parts water, one part to one part. Next, fill a spray bottle with the liquid and give it a little shake to combine.
Applying a vinegar solution to infested plants discourages mealybugs by altering their feeding context. To keep soil pH levels stable, lightly spritz plants’ leaves and stems rather than the soil itself. The acidity of vinegar could harm orchids and other sensitive plants, so it’s best to start with a small area.
An affordable method to disrupt insect behavior is to apply vinegar for mealybug removal every four to five days for two weeks, targeting all life stages. After each application, give plants a gentle rinse to remove any excess vinegar and prevent leaf stains.
When used as a prophylactic measure or when administered to houseplants during the early stages of infestation, vinegar spray treatment yields the best results. When dealing with dense infestations of pests, physical elimination is often necessary for expedited results. To avoid any unintended side effects, monitor the plant’s response and make any required adjustments to the dilution.

According to eco-friendly gardening practices, controlling mealybugs with vinegar naturally is a valid statement. Properly label the solution and store it in a cool place to avoid its overuse. Preventing plant disease with regular sprays and inspections is simple and effective against mealybugs.
| Ingredients | Quantity | Application Frequency | Notes |
|---|---|---|---|
| White vinegar | 1 part | Every 4-5 days | Dilute with 3 parts water |
| Water | 3 parts | Test on sensitive plants | |
| Dish soap | 1 drop | Enhances adhesion |
Using Essential Oils to Deter Mealybugs Safely and Naturally
To repel mealybugs, Applying essential oils to mealybugs suggests using powerful plant extracts like peppermint, eucalyptus, or tea tree oil. In a quart of water, add a single drop of dish soap and ten or twelve drops of oil. Lightly mist the affected plants, paying special attention to areas that are particularly vulnerable to pests.
To prevent mealybugs from moving around and feeding, treating plants with essential oil sprays uses strong scents. Make sure there is enough ventilation in the room to avoid stifling the air quality. Do a spot test on a leaf first, since some plants may be sensitive to concentrated oils.
As an aromatic and non-toxic alternative to chemical pesticides, using essential oils for mealybug control is a solution worth considering. For a three-week period, you should reapply every seven days to ensure that all insects are deterred. The combination will keep the oil effective and prevent it from deteriorating if stored in a dark glass bottle.
Following the eradication of infestations, repelling mealybugs with essential oils is an effective prophylactic measure. Combine with neem oil for stubborn cases; experiment with other treatments for variety. A homogeneous coating will maximize the repellent effect on all surfaces of the plant.
Controlling mealybugs using essential oils enhances the quality of the indoor environment and makes plants healthier. Always be ready to dilute the mixture if you notice any signs of leaf stress. This natural method provides ongoing protection when used in conjunction with regular plant care procedures.
| Ingredients | Quantity | Application Frequency | Notes |
|---|---|---|---|
| Essential oil | 10-12 drops | Every 7 days | Peppermint, eucalyptus, or tea tree |
| Water | 1 quart | Store in dark glass bottle | |
| Dish soap | 1 drop | Test on leaf first |
Implementing Hot Water Treatments to Eradicate Mealybugs
To kill mealybugs, immerse injured plant parts in 120°F-heated water for ten to fifteen seconds. Plants require a thermometer to verify the exact temperature, as overheated water could scorch them. Quick rinsing with cold water will reverse the heat’s effects.
Caution should be exercised when treating plants with hot water dips on delicate species; nonetheless, this method is effective for hardy plants such as succulents and tropicals. Start by testing a little stem to ensure tolerance. Do this once weekly for three weeks to eliminate any and all stages of bugs, including eggs.
By directly targeting mealybugs, applying hot water for their removal eliminates them without leaving any chemical residues. Instead of focusing on the roots, which can damage the soil, try focusing on the branches and leaves. To lessen fungal hazards, which are especially severe in humid areas, use a fan to blow plants dry after treatment.
With caution, controlling mealybugs with hot water can protect plants from stress. Incorporate manual removal with this process sparingly for thorough results. To prevent the spread of any remaining pests, plants were confined for two weeks.
Quick and eco-friendly, Eliminating mealybugs using hot water can handle small infestations. Please ensure the pests have not returned by continuing to conduct regular follow-up checks. Although it requires significant effort, this method offers dedicated gardeners a powerful option that doesn’t use chemicals.
| Parameters | Value | Frequency | Notes |
|---|---|---|---|
| Water temperature | 120°F | Weekly for 3 weeks | Use thermometer |
| Submersion time | 10-15 seconds | Test on hardy plants |
Boosting Plant Health to Resist Mealybug Infestations Naturally
At its core, improving plant health to deter mealybugs is about bolstering plants’ inherent defenses by means of best-practice gardening. Give your plants plenty of water, balanced, slow-release nutrients, and indirect, bright light. Healthy plants are more resistant to pests, which reduces their attractiveness and harm from mealybugs.
For this reason, regular pruning is an important part of strengthening houseplants against mealybugs since pests feed on unhealthy or diseased growth. Use a damp towel to wipe the leaves to eliminate dust and any potential insect eggs. Soil combinations that drain well will help keep pests at bay, especially when it comes to root stress.
Maintaining plant vigor for mealybug resistance requires vigilant monitoring of humidity and air circulation because mealybugs thrive in dark, damp places. Indoors, you can create an unsavory ambiance by turning on fans or dehumidifiers. Overfertilization attracts mealybugs and other insects that feed on plant sap, so be careful not to apply too much nitrogen.
We use a two- or three-week quarantine period for immature seedlings to enhance plant resilience to mealybugs and keep pests out. To ensure a smooth integration, check the soil, containers, and leaves carefully. Repotting and using the right-size pots are examples of routine maintenance that help plants stay strong and resistant to pests over time.
Preventing mealybugs through plant health is an attitude that is both proactive and enduring. To enhance protection during vulnerable seasons, combine with natural remedies like neem oil. To keep pests at bay, it’s best to cultivate hardy plants that can bounce back fast from minor illnesses.
| Practices | Purpose | Frequency | Notes |
|---|---|---|---|
| Watering | Maintain hydration | As needed | Avoid overwatering |
| Nutrient application | Balanced, slow-release | Per plant needs | Avoid excess nitrogen |
| Pruning | Remove unhealthy growth | Regularly | Reduces pest attraction |
| Leaf wiping | Remove dust/eggs | Weekly | Use damp towel |
| Quarantine | Prevent pest introduction | 2-3 weeks | For new plants |
Using Companion Planting to Repel Mealybugs from Your Garden
The technique of planting companion plants to deter mealybugs protects susceptible plants by utilizing natural pesticides such as chrysanthemums, marigolds, etc. To provide a natural defense against pests, put these buddies close to your garden beds or houseplants. The risk of a mealybug infestation is reduced by their strong smells, which mislead the pests.
Companion planting for mealybug control has been practiced for a long time and is environmentally safe. Basil, mint, and rosemary are a few herbs that provide pest-repelling aromas. Planting different companion plants at different times of the year will help keep soil healthy and provide a consistent barrier against pests in your garden.
Repelling mealybugs with companion plants is helpful for garden ecosystems in general since ladybugs are beneficial insects that feed on mealybugs. Avoid trapping moisture and attracting pests by keeping plants at a safe distance from one another. Pruning companion plants on a regular basis keeps them healthy and productive.
Because it reduces the need for pesticides, controlling mealybugs with companion planting is ideal for organic gardeners. Houseplants that are particularly susceptible to pests should not be too far away from herbs in pots. Be vigilant for pest activity, as neglected companion plants can attract other types of insects.
Preventing mealybugs using companion plants creates a more robust and pest-proof ecosystem. When combined with sticky traps or when dealing with active infestations, they provide effective control. This eco-friendly solution not only protects your plants but also gives your garden visual interest and variety.
| Companion Plants | Repellent Property | Placement | Notes |
|---|---|---|---|
| Marigolds | Strong scent | Near susceptible plants | Regular pruning |
| Chrysanthemums | Natural pesticide | Garden beds | Enhances ecosystem |
| Basil | Pest-repelling aroma | Near houseplants | Monitor for pest activity |
| Mint | Pest-repelling aroma | Potted near plants | Avoid overcrowding |
| Rosemary | Pest-repelling aroma | Garden beds | Maintain plant health |
Creating a Sticky Trap System to Capture Mealybugs Effectively
To attract and catch crawling pests, setting up sticky traps for mealybugs makes use of sticky cards in a bright yellow color. Placing traps near diseased plants at canopy level will capture crawlers that are on the move. Replace traps every seven to ten days, or whenever pests begin to engulf them.
In conjunction with other treatments, the passive and non-toxic method of using sticky traps to control mealybugs can be effective. To avoid catching beneficial insects, including pollinators, set traps in strategic areas. When kept indoors, secure the traps to pots or poles to prevent them from tumbling over in areas with a lot of foot traffic.
Capturing mealybugs in traps reveals how active the infestation is and provides information on how severe it has become. When the capture rate is high, it means that harsh treatments like neem oil or alcohol are needed. Put away used traps in tight bags to prevent bugs from escaping.
In enclosed spaces like indoor gardens or greenhouses, controlling mealybugs using sticky traps is a lifesaver. Do not place traps in areas where there is a strong wind, as this will reduce their stickiness. To make sure your pest control strategy is working, check the traps often to see how things are going.
Eliminating mealybugs with sticky trap systems ensures long-term protection when applied consistently. Following the subsidence of an infestation, keep traps as a monitoring tool to detect early signs of return. Any pest control plan can incorporate this method due to its effectiveness and ease of use.
| Trap Features | Specifications | Frequency | Notes |
|---|---|---|---|
| Color | Bright yellow | Replace every 7-10 days | Attracts crawlers |
| Placement | Canopy level | Secure indoors | |
| Disposal | Sealed bags | Prevents escape |
Maintaining Ongoing Prevention to Keep Mealybugs Away for Good
The key to preventing mealybug infestations long-term is to take preventative measures, like doing plant inspections. Look for honeydew or cottony masses in the dirt, on the leaves, and in the stems with a magnifying glass for precision. Plants in their first two or three weeks of life should be quarantined to avoid the introduction of hidden pests.
Strict hygiene regulations state that maintaining pest-free houseplants is essential. Use a 10% bleach solution to sterilize benches, pots, and utensils to eliminate bug eggs. Stay away from watering your plants too much, as mealybugs thrive in damp soil and high humidity.
Keeping mealybugs away from plants means making the neighborhood a better place to live. Use fans to reduce the humidity around plants and enhance air circulation. It is important to promptly remove debris and fallen leaves, as they provide a hiding spot for bugs and encourage the spread of mold.

Sticky traps and rotating neem oil sprays are only two of the many methods used for ensuring long-term mealybug prevention. To avoid overly lush growth that parasites love, make sure to fertilize sparingly. Repot plants often to add soil and inspect roots for mealybug colonies.
To prevent mealybugs from coming back, you need to consistently watch for seasonal changes that might increase pest activity and use different natural solutions to avoid pests becoming resistant. By making your environment pest-proof, you can keep your plants looking lovely and healthy all year round.
| Prevention Methods | Actions | Frequency | Notes |
|---|---|---|---|
| Plant inspection | Check for honeydew/cottony masses | Weekly | Use magnifying glass |
| Quarantine | Isolate new plants | 2-3 weeks | Prevents pest introduction |
| Sterilization | 10% bleach solution | As needed | For pots and utensils |
| Air circulation | Use fans | Continuous | Reduces humidity |
| Debris removal | Clear fallen leaves | Regularly | Prevents pest hiding spots |
Conclusion
Simple, all-natural remedies can effectively rid your plants of mealybug infestations without the use of harmful chemicals or expensive treatments. This comprehensive guide provided 14 strategies, such as alcohol swabs and companion planting, that may be put into action immediately to yield rapid and eco-friendly outcomes. Using these methods, gardeners of all skill levels may fearlessly battle pests using everyday items.
Early detection and consistent administration are the cornerstones of any effective approach, be it sticky traps, neem oil sprays, or manual eradication. By blending remedies and tailoring them to your plants’ needs, you can eradicate mealybugs and prevent their return. Improving plant health and maintaining hygiene are examples of preventative measures that can provide a strong barrier against subsequent infestations.
In keeping with sustainable gardening ideas, these non-toxic remedies protect not just your plants but also your living environment. Strategic care techniques, changes to the environment, and regular monitoring all contribute to long-term success. See which of these methods your plants respond best to, and tweak as needed to maintain a thriving collection.
The mealybug problem shouldn’t be too much of a problem for your houseplants. You can stay quick and appealing while taking swift, efficient action with this broad armament at your disposal. Follow these simple steps with care, and your plants will be healthy and beautiful for years to come, free of pests.
Source: www.agrifarming.in